I don’t want to bother you all with the history of failed tests and re-tries I’ve made to complete this process, but I want to help you with some hints I’ve collected around the world during my fight in achieving this goal. And I can assure you: IT. COULD. WORK. 😉
First let’s make some assumption: what do we want? We want to create a web site on our QNAP NAS and publish it within the domain (plain domain, no hosting) we have just bought. And we want people to write in the browser mydomain.com and not something complicated, with ports or long addresses. And we want it secure, so that any browser doesn’t give us back security warnings. Easy to explain, isn’t it?
tl;dr
1. don’t use “redirect domain” unless you want to expose your real IP, buy a plain “domain with DNS management” site
2. use the configuration panel on your domain register seller to create a correct “A” record in the DNS management section to link your QNAP to your domain name
3. setup QNAP so that web service is on, listening to port 80 for http and 443 for https, and switch OFF any virtual hosts
3bis. don’t worry, you can change the ports later, if you don’t want to use the default ones, and you can use Virtual Hosts too, after the SLL creation and import
4. use the free SSL certificate creation procedure going to the web site: www.sslforfree.com and use the manual verification to create the certificates (it will be used the Let’s Encrypt free ACME client and trusted root certificate)
5. install the certificate into QNAP web interface (system –> security –> certificate & private key)
6. turn on again the Virtual Hosts (if needed) and correct your ports into the QNAP and remember to change also the port-forwarding into the ISP router to align them
7. amend the WordPress configuration to make it work directly with your QNAP web server main page and
long version
So, problem is: there are a lot of possible configurations you can stumble upon in internet and lot of reasons for people to push you in a direction or another. So there is no a good-for-everyone solution.
I can split things in three different main arguments:
• Domains & Hosting (with DNS)
• QNAP configuration & SSL creation/import
• (optional) WordPress setup
Domains & Hosting 1
Do not take into consideration to choose a “redirect hosting” solution (with of without email, it doesn’t matter): it will not work or – at least – you will not obtain a really good result. Why? Because redirection made by all the domain re-sellers uses iFrame technology and this means that:
1. you can choose to make a 301 redirection, so called “permanent” and expose to everybody your real IP address; let’s make an example: you buy the domain mydomain.com but you want to redirect it to your QNAP (IP 1.2.3.4) where your web server has been installed. People will type mydomain.com into the browser address bar and than the system will bring users to 1.2.3.4 . And the address bar will show everybody 1.2.3.4… What??!! Yes, since it’s a permanent redirect, the domain hosting will expose the address you wrote them to redirect to.
2. you can choose to make a 302 redirection, a “temporary” one, but nothing will change from the permanent, so we are in the same situation.
3. and so, desperate, you choose to make the last choise, a frame redirection, so that your IP should be covered by the so called “iFrame”… unluckily for you, not every web site will accept it, so WordPress, or Joomla, the two largest community of personal pages, will not work and result you with a blank page.
Domanis & Hosting 2
As I explained in the above paragraph, a “redirect” solution for domain hosting is not a wise solution, so what we can do? We have to buy the domain with just the plain “manage DNS” solution, that’s the way.
This option will – by default – link your newly bought domain name to a web page hosted onto your domain register company and will bring you to a generic page (more of the times it’s something link “page under construction”) and you have to change it pointing it to your QNAP IP address. To make it you have to change the hosting DNS (do not think of using your own DNS unless you know what you’re doing. Use and manage the DNS provided by the Domain Register.
You have to create at least 2 records in the DNS section. This procedure can be different based on which company you chose. For example in GoDaddy you can create an “A” record (the master and default one) pointing to your domain without the www before and then create a “CNAME” record (to be intended as an alias) using the www like shown in the following table:
| Type | Name | Value |
|---|---|---|
| A | @ | 1.2.3.4 |
| CNAME | www | @ |
Basic explanation is: the master “A” record will bring everyone writing in the browser your mydomain.com address to your IP. The “CNAME” record will create an alias that will link the www.mydomain.com address to your main record and so to your IP.
Some other Domain Register Companies (like Aruba) don’t like a “CNAME” record pointing to the master “A” record and so you need to create two “A” record, like shown in the following table:
| Type | Name | Value |
|---|---|---|
| A | (empty) | 1.2.3.4 |
| A | www | 1.2.3.4 |
This is all you need to do for configuring DNS and Domain to point to your mydomain.com. If you want to use your QNAP without SSL (so using a not-anymore-considered-secure http) you can end reading here and go configuring your web page. If you need also a SSL certificate and you want to use https protocol you can go on.
QNAP configuration
To create a working configuration, and I mean secure and accepted, we need first to set up the QNAP and then create the SSL private key and certificate. The steps inside QNAP web interface are split in 3 places:
1. control panel – application – web server – web server
2. control panel – application – web server – virtual host
3. control panel – system – security – certificate & privacy key
PRELIMINARY NOTE
If you didn’t turn on the “web server” functionality on QNAP before, it means you are accessing the QNAP web interface simply writing in the browser address bar mydomain.com and the system manage the ports for you. On the contrary, as soon as you turn Web Server on, to access the login page you will need to tell the browser the port number too. So, assuming your system port for normal http connection (located in “control panel” – “system” – “general settings” – “system administration”) is 1234 and the secure connection https is 5678:
| Type | Before | After |
|---|---|---|
| Login Page (http) | mydomain.com | mydomain.com:1234 |
| Login Page (https) | mydomain.com | https://mydomain.com:5678 |
| Web Site (http) | n.a. | mydomain.com |
| Web Site (https) | n.a. | https://mydomain.com |
WEB SERVER
In this section we have to check if the web server is switched on, using port 80 for normal http connection and using 443 for secure https connection:
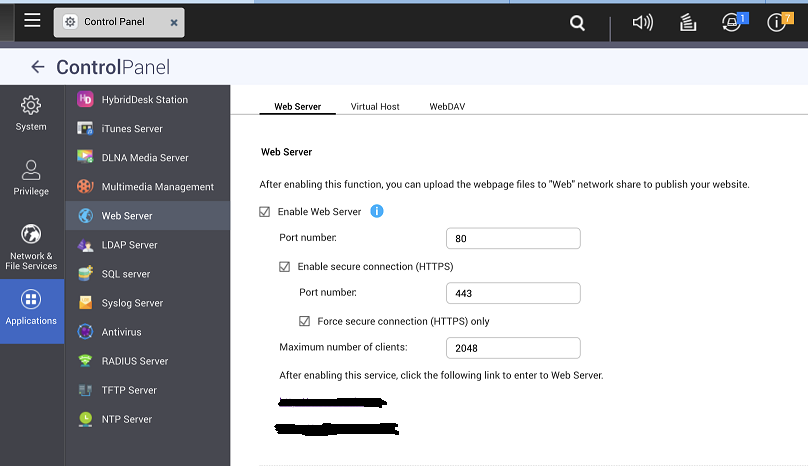
NOTE: don’t worry if you don’t want to use the default ports to create the connection, later on, while the certificates are created and imported, we can change them to some different (providing we change also the port-forwarding within the ISP router)
VIRTUAL HOSTS
I know some people want to create more than one web page inside his QNAP, and are using this solution to link one domain to a folder and another domain to another folder. In this case, to generate the SLL certificates, we need to switch it OFF just for the time needed for the cretion, than we can switch it on again:
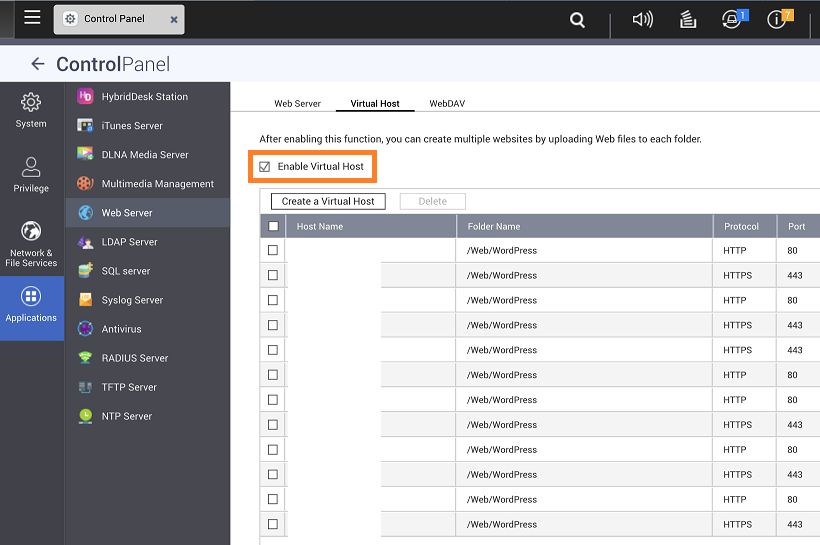
NOTE: don’t worry, as I wrote, we can turn it on again after the certification procedure
CERTIFICATE & PRIVATE KEY
Ok this is the last step but – before we can import the certificate and re-enable the Virtual Hosts – we need to create them. To do it we must go to www.sslforfree.com and begin the process.
Keep in mind that we need to create a multi-domain certificate since every domain we buy goes out with a plain name (mydomain.com) and a world-wide-web name (www.mydomain.com). For this reason, enter in the main bar of the page your domain name, followed by a space and then the same domain name with the www. before it. Like in this screenshot:

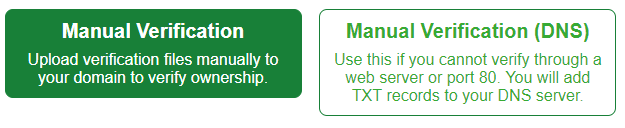
After the generation of the keys, the provider must test and validate them. For this it’s been asked to make an automatic verification, or a manual verification. The automatic will try to import the keys by itself and communicate through the default ports to the QNAP. In my case, there was no way to make it work and I had to choose a manual validation. Choose the “manual verification” and not the “manual verification (DNS)”:
Follow the procedure so that the web page let you download the validation certificate and save them to the main folder of your web server. OK, OK, don’t worry. you just need to enter your server, locate the main web-server folder and create a sub-folder called “.well-known” (to create a folder in Windows starting with a dot, you have to put a dot at the end; so to create this folder you shall write: “dot well-known dot”). Inside this new folder create another one called “acme-challenge” and insert the downloaded files to it.
Now the last and more delicate part: press the “download SSL certificate” to make the validation procedure start and test your QNAP and domain. If you did everything like I wrote in this guide the web site will create a zip file with the private key of your newly verified domain and the certificates, so you can import it into the QNAP.
To do this, return on your QNAP web interface, go in “control panel” – “system” – “security” – “certificate & private key” and press “import”. Fill all the 3 fields with the files you just downloaded and press “apply”. Close and re-login.
(optional) WordPress setup
This part is optional, not everyone need or want to set up a WordPress (or similar) web page, so if you don’t need it you can skip it.
When you finish to import SSL certificates you can turn the QNAP Virtual Hosts feature on again, linking your domain to the correct sub-folder. In this example you should create something like that:
| Domain | Folder | Port |
|---|---|---|
| mydomain.com | /Web/WordPress/ | 80 |
| mydomain.com | /Web/WordPress/ | 443 |
| www.mydomain.com | /Web/WordPress/ | 80 |
| www.mydomain.com | /Web/WordPress/ | 443 |
And remember to install and insert the right path into the general settings of WordPress, in the fields “WordPress Address (URL)” and “Site Address (URL)”. The path should be just the domain. So in this example: https://mydomain.com
Another step you should do is installing the plugin Really Simple SSL in order to complete the WordPress setup automatically and do not worry about any more settings.
From now on, you can access your new web site and WordPress blog/activity simply by writing mydomain.com and the system will do the rest.
Notes
1. If you need, you can choose to change the original port for the transmission protocol http and https. Remember that if someone write in the browser address bar mydomain.com is using by default port 80 (or 443 if writes https:// before the domain name). So you need to use port-forwarding rules to set up into your main router.
2. If you already had an installed version of WordPress and you follow this procedure, you could be unable to access the WordPress main page because of Virtual Hosts activation and https ports redirection. If this is the case, you could install into the QNAP the pypMyAdmin application and login in it. Search the database used by WordPress (usually called “master”) and open it. Locate the table “options” (watch out that all the tables have a prefix managed by the WordPress installation, usually wp1_) and amend the two records pointing to the site, called: “siteurl” and “home”. Remember to put also https:// before your domain name.
Hi there! Such a great article, thank you!
I like the valuable information you provide to your articles.
I’ll bookmark your blog and take a look at once more right here regularly.
I’m relatively sure I will learn a lot of new stuff right right here!
Good luck for the following!
great post.Ne’er knew this, appreciate it for letting me know.
Everyone loves it when people get together and share opinions. Great site, stick with it!
I have long looked for Domain on QNAP, DNS and SLL Certifications (or: how to handle everything without losing your mind) article, it is
the BEST content, full of ideas and very useful!!
I want to share a 65% Discount on the best web hosting in 2020: https://bit.ly/NextWebHosting
Thank you for this information, good luck!