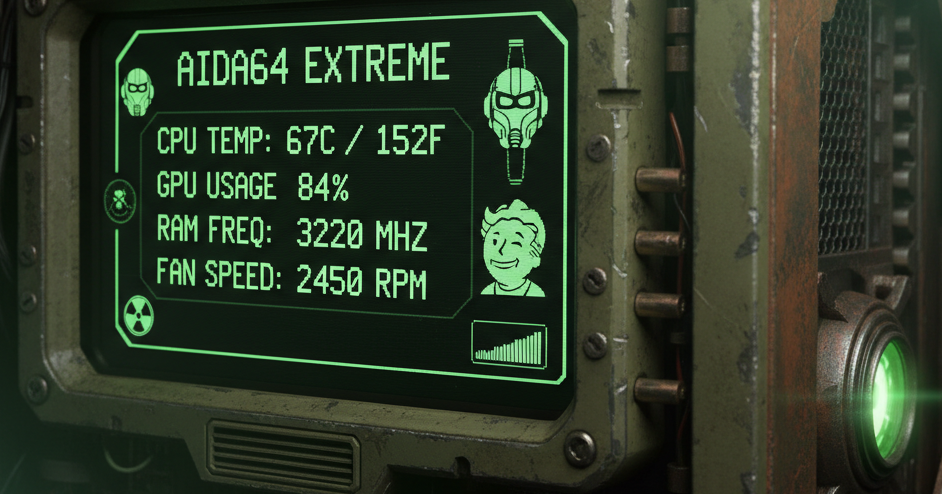
Sometimes it happens that Windows 10 chooses not to change Spotlight loading screen images anymore. I’ve fought with this problem a couple of time already, and I’ve found all the solutions in internet confusing: some pages requires many (useless) steps, and some are not completed. If this is your case – lucky you – just follow this steps to bring Spotlight back to life ๐ 1. Enter Windows 10 settings and choose “personalization”, then on the left choose “lock screen” to get the actual settings of your computer. Switch the current setting to “picture” so that “Windows Spotlight” is not used anymore (see picture below): 2. Navigate into the following 2 folders and delete all the files inside (be careful not to delete the folder itself but only the files!). In the string change “USERNAME” accordingly with your Windows login usersname: 3. Now open PowerShell with administrative rights. To do this, press Windows Start with the right mouse button and choose “Windows PowerShell (Admin)” (image below on the left) or press Windows Start with the left mouse button and type “powershell”, then right click on the first result and choose “run as administrator” (image below on the right) 4 . Copy and past the string below into the PowerShell console so to reboot the Windows Spotlight system and force it to reload the data: 5. After the program finishes to load and return the prompt again, close the PowerShell console. Open again the Windows settings, navigate to the “lock screen”
Domain on QNAP, DNS and SLL Certifications (or: how to handle everything without losing your mind)
I don’t want to bother you all with the history of failed tests and re-tries I’ve made to complete this process, but I want to help you with some hints I’ve collected around the world during my fight in achieving this goal. And I can assure you: IT. COULD. WORK. ๐ First let’s make some assumption: what do we want? We want to create a web site on our QNAP NAS and publish it within the domain (plain domain, no hosting) we have just bought. And we want people to write in the browser mydomain.com and not something complicated, with ports or long addresses. And we want it secure, so that any browser doesn’t give us back security warnings. Easy to explain, isn’t it? tl;dr 1. don’t use “redirect domain” unless you want to expose your real IP, buy a plain “domain with DNS management” site2. use the configuration panel on your domain register seller to create a correct “A” record in the DNS management section to link your QNAP to your domain name3. setup QNAP so that web service is on, listening to port 80 for http and 443 for https, and switch OFF any virtual hosts3bis. don’t worry, you can change the ports later, if you don’t want to use the default ones, and you can use Virtual Hosts too, after the SLL creation and import4. use the free SSL certificate creation procedure going to the web site: www.sslforfree.com and use the manual verification to create the certificates (it will be used
Hello world!
Welcome! This is the first post (for testing purpose). I’ll delete it as soon as I start writing! (update) I’m thinking of leaving this first-automated post, which has been there from the beginning, welcoming me at every test… I’m getting used of it, and growing fond of it ๐